Woodturning
At the suggestion of my better half I decided to branch out (sorry!) and try my hand at woodturning. Having last laid hands on a gouge some 45 years ago I decided that a cheap starter lathe was in order. Axminster were doing a special end of line offer on a Perform CCLB lathe and having seen from various forums that there were plenty of satisfied users about, that′s what I got. Despite being the last of this make available, spares should not be a problem as Axminster still sell what is essentially the same lathe but now in their own livery for a few pounds extra.
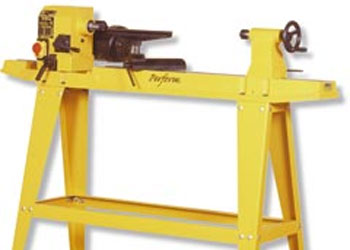
The lathe duly arrived and was unpacked in the workshop, it is actually quite long and I had to rearrange slightly to fit it in. As supplied the lathe comes with a pressed steel stand and the whole thing is painted bright yellow (1). I had read that a light stand could render a lathe of this type liable to vibration problems so I set to beefing it up a bit. I also opted for a colour change as the original colour didn′t match my other machinery!
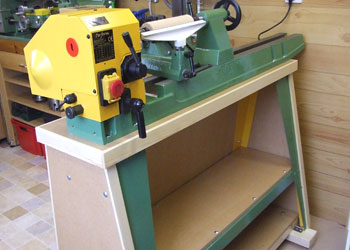
Apart from adding weight and rigidity to the stand I also wanted it a bit higher to raise the centre height of the lathe. I added a 4"x2" frame bolted to the bottom of the legs using some heavy slotted angle (Dexion). I fitted a pair of castors at the headstock end to make moving the lathe easier if necessary. The castors are screwed to the underside of the frame and a pair of heavy duty adjusters on the outside can level the lathe and lift the castors clear of the floor. The remainder of the stand I covered with 18mm MDF bolting this to the stand with coach bolts and nuts. I also fitted a bench-top to the stand made from 2 layers of 18mm MDF glued together (2). The MDF end panels also screw to the bottom frame. The amount of weight added is quite considerable and an added bonus is two shelves to store accessories. To finish it off and hide the bare edges of the MDF I fitted some softwood edging. The timber and MDF was treated with acrylic varnish and the lathe, with the exception of the headstock, I painted green; a definite improvement on the bright yellow. I don′t anticipate any large bowl turning so I didn′t fit the bed extension to the left of the headstock, this also saves a bit of space in the workshop.
Having taken the lathe apart to paint I took the opportunity to remove some of the worst Chinese engineering. There are a lot of sharp corners and casting flashes and paint missing where it should be and on things it where it shouldn′t be. A couple of minor niggles became apparent once back together. The tailstock is not a particularly good fit on the bed and there is enough movement to throw the centre off-line. I will epoxy a couple of brass shims to the tailstock to tighten this up. The detent that locates the headstock is a poor fit in the slots and allows the headstock to rotate by a good couple of degrees. With the freedom of both the headstock and tailstock to twist it is possible to get the centres out of horizontal alignment by about 6mm. Fortunately the vertical alignment is OK and I think the headstock detent can be re-engineered. The handles on the tailstock cam-lock and the banjo cam-lock are uncomfortable to use and I may make a couple of replacements.
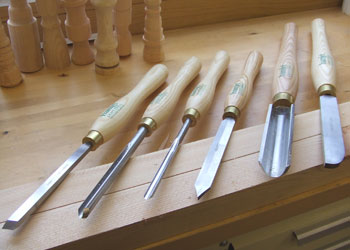
The lathe of course is only the first bit, to do anything useful you need some tools. There are various beginners sets on the market and each manufacturer offers their own version. For a change in the U.K. we are blessed with probably the best selection of high class manufacturers anywhere in the world. I thought it a good idea to buy these first hand rather than by mail order so I took myself for an informative and expensive day out at the Tool Post in Didcot. I bought a collection of 6 tools made by Hamlet (3) viz:-
- HCT100- 1/2" Rectangular Skew Chisel with 10" Ash handle
- HCT088- 3/8" Bowl Gouge Short with 10" Ash handle
- HCT068- 3/8" Spindle Gouge (round bar) with 10" Ash handle
- HCT092- 3/16" Diamond Parting Tool with 10" Ash handle
- HCT065- 1.1/4" Roughing Gouge with 14" Ash handle
- HCT142- 1" x 3/8" Heavy Duty Bowl Scraper with 14" Ash handle
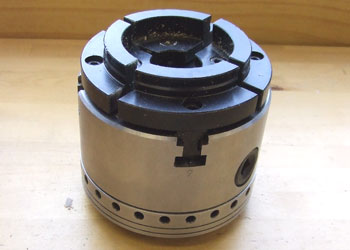
Whilst at the Toolpost I also bought one of their VersaChucks. This is based on an engineering scroll chuck and with the supplied backplate is fairly heavy when compared to some of the other chucks available. The chuck comes in a wooden box complete with keys three sets of mounting jaws and a set of dovetail accessory jaws. The three sets of mounting jaws allow the use of accessory jaws from Axminster, Nova and OneWay (4).
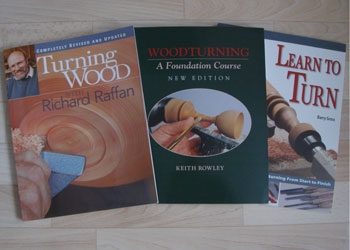
Having not much idea what to do next I read a few books to help me in the right direction. Woodturning - A Foundation Course by Keith Rowley I found to be very useful as is Turning Wood by Richard Raffan. Learn to Turn by Barry Gross is a lighter read but has some useful beginners projects (5).
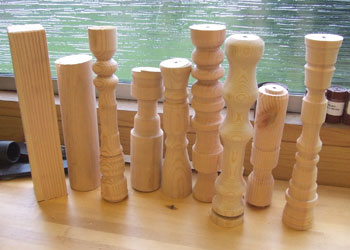
I bought a couple of lengths of 2" x 2" softwood and set to making shavings. I quickly discovered it wasn′t quite so easy as it seems from the books! I managed to turn a few practice spindles (6) but am now off to get some lessons and then hopefully I can try making something useful.
Update - A Few Examples
Well I took a couple of lessons and made quite a few bowls and lots of pens. I thought it was worth trying this but despite having got the equipment I have not done very much. The main thing that stops me is the mess. Sawdust and wood shavings do not mix well with oiled machinery similarly oil and metal swarf do not work well with wood! If I had a separate workshop I might do a bit more. Even using some basic dust extraction (the shop vac) fine dust from sanding gets everywhere.
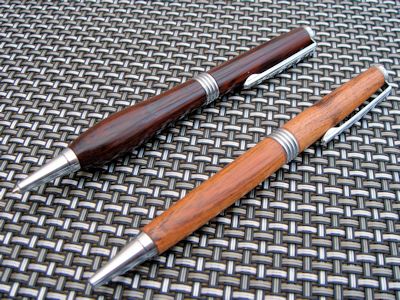
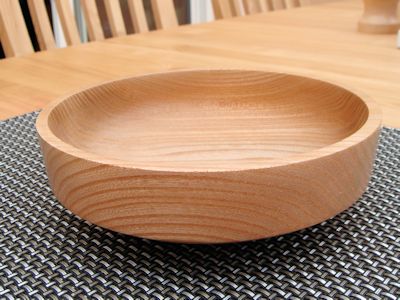
Still it was worth a go, a couple of my efforts in the photo. I made loads of pens, all given away, they are quick, easy and not too messy. The one at the front is from an old pallet, no idea what the wood was. The bowls I made are now scattered around the house, you can only use so many and then it′s bowled out!